WpW: Installing OpenLiteSpeed, WordPress, and LSCache

Welcome to another installment of WordPress Wednesday!
Today’s Topic: Installing OpenLiteSpeed WordPress and LSCache
So, you want to self-host a WordPress site, and you want to accelerate it with LiteSpeed Cache. That’s great news! LiteSpeed Cache for WordPress can easily be installed through your WordPress Dashboard. However, it requires a LiteSpeed web server in order to function. This guide will walk you through the installation of three free and open source pieces of software: OpenLiteSpeed, WordPress, and LiteSpeed Cache for WordPress.
When we’re done, you’ll have your own brand new, self-hosted WordPress site, powered by LiteSpeed.
Please note the versions of everything we are talking about today:
OpenLiteSpeed: 1.4.28
WordPress: 4.9
LiteSpeed Cache for WordPress: 1.6.4
If you are using different versions of any of this software, your experiences with this tutorial may vary.
Why OpenLiteSpeed?
LiteSpeed Cache is a server-level cache. The WordPress plugin provides an easy way for site admins to communicate with the server, but it does not implement any of the caching functionality itself. For this reason, you are required to have a LiteSpeed web server. Without one, the plugin has nothing to talk to.
You may choose between LiteSpeed Enterprise and OpenLiteSpeed. We’ll be focusing on the latter today, but if you’re wondering which server is right for you, you can compare editions (and take a little quiz, if you like) here.
Please note: not all LSCache functions are supported by OpenLiteSpeed. If you will be using ESI, for instance, you will need LiteSpeed Enterprise.
OpenLiteSpeed One-click installation
ols1clk is a one-click installation script for OpenLiteSpeed. Using this script, you can quickly and easily install OpenLiteSpeed with it’s default settings. By adding different parameters, you can use it to install WordPress and the LiteSpeed Cache.
Currently one click installation only supports Centos(5-7), Debian(7-9) and Ubuntu(12,14,16)
ols1clk must be run with superuser access, You can either switch to superuser (root) with the su command or you may run it as root using the sudo command. How you do this will depend upon which distribution you use. Some distributions enable the root user (such as CentOS), while others do not (such as Ubuntu and Debian).
There are two different one-click methods: Direct Download and Command Line Interface.
Direct Download
- Download
ols1clkfrom GitHub. - Run the
ols1clkscript on your server command line with./ols1clk.sh or bash ols1clk.sh;
CLI Installation
Run the following from the command line:
wget --no-check-certificate https://raw.githubusercontent.com/litespeedtech/ols1clk/master/ols1clk.sh; bash ols1clk.sh;
OR, run the following from the command line:
bash <( curl -k https://raw.githubusercontent.com/litespeedtech/ols1clk/master/ols1clk.sh ) [options] [options] …
The above methods will install OpenLiteSpeed and the lsphp module. For additional options, examples, and a FAQ, see the OpenLiteSpeed wiki.
WordPress Installation

To install WordPress along with a MySQL database, run the following from the command line:
./ols1clk.sh -w.
Answer any prompts within the script and you’re done!
LSCache for WordPress Installation
- Download the LSCWP plugin from our WordPress Plugin Directory page.
- Log in to your WordPress Dashboard, navigate to Plugins > Add New and click on Upload Plugin.
- Select the LSCWP zip file and click Install Now. Activate the plugin.
- Navigate to LiteSpeed Cache > Settings > General and set Enable LiteSpeed Cache to
Enable.
OR
- Search for
LiteSpeed Cachein the search box. Our plugin should be the first search result to come up. - Press Install Now. Activate the plugin.
- Navigate to LiteSpeed Cache > Settings > General and set Enable LiteSpeed Cache to
Enable.
Testing
Once you have installed LiteSpeed Cache for WordPress, you’ll want to run a few tests to be sure that it’s working as expected.
You can verify a page is being served from LSCWP through the following steps using your browser’s developer tools:
Step 1: Open the developer tools on a non-logged-in browser and navigate to your site. Open the Network tab.
Step 2: Refresh the page.
Step 3: Click the first resource (this should be an HTML file and the resource’s headers should appear as in the image below). For example, if your page is http://example.com/wordpress/, your first resource should either be something like example.com/wordpress/ or wordpress/.
Step 4: In a different, logged-in browser, in your WordPress Dashboard, navigate to LiteSpeed Cache > Manage and click the Purge All button.
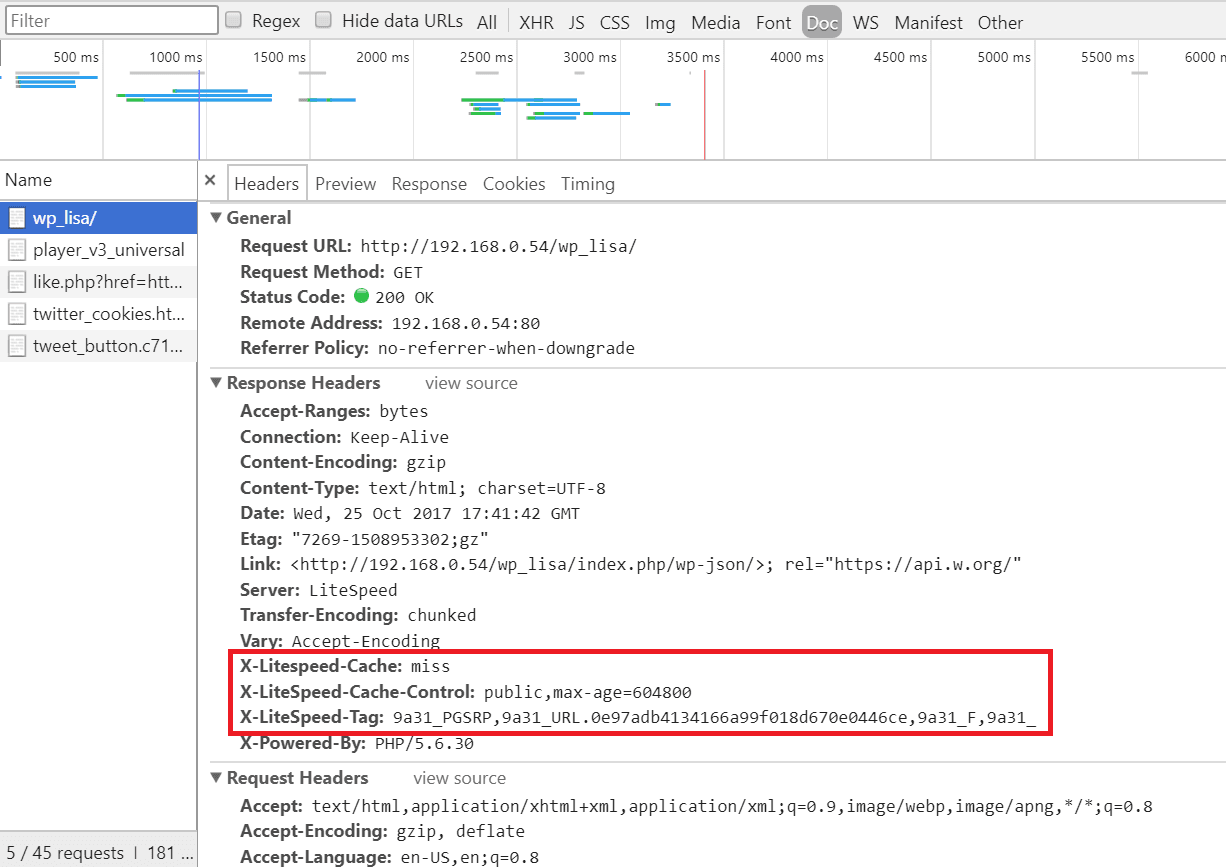
Step 5: Reload the page in the first (non-logged-in) browser and select the same resource again. If you see headings similar to
X-LiteSpeed-Cache: miss
X-LiteSpeed-Cache-Control:public,max-age=1800
X-LiteSpeed-Tag:B1_F,B1_
(for example), this means the page had not yet been cached, but that LiteSpeed has now stored it for future use.
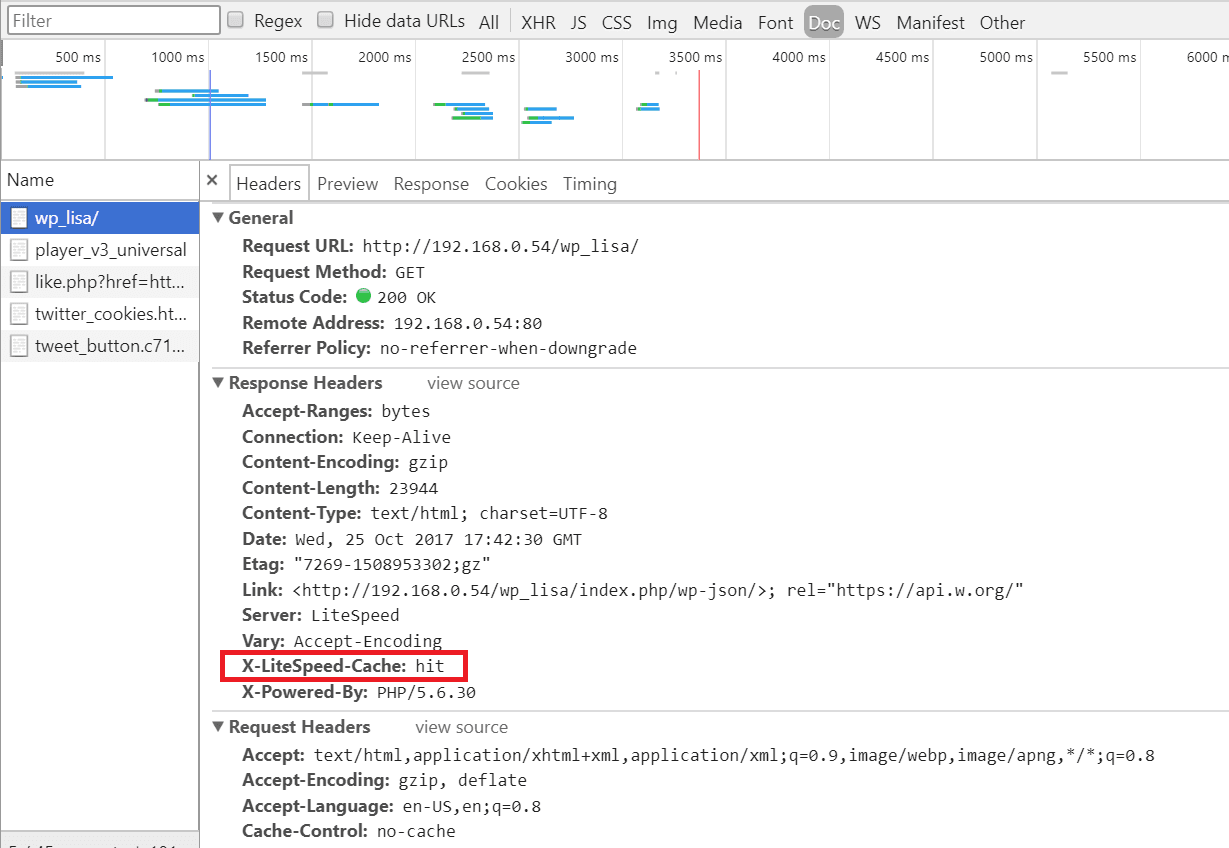
Step 6: Reload the page a second time and you should see X-LiteSpeed-Cache: hit in the response header. This means the page is being served by the cache and LSCWP is configured correctly.
Note: If your first refresh after purging returns X-LiteSpeed-Cache: hit in the response header, this may be because someone else visited the page after you purged but before you refreshed it yourself. Try again from step 4.
Finding Errors
To check the debug log, enter the following at the command line:
tail -f wp-content/debug.log
How to report problems you can’t fix
If you run across a problem you can’t solve on your own, we are here to assist! If you take the time to gather a few of the following things before contacting us, it will help us to help you better:
- Screenshots: If there are any error messages, grab a screenshot so we can see where it happens.
- Environment Report: Navigate to LiteSpeed Cache > Environment Report > and press the Send to LiteSpeed button. You’ll be given a report number. Save the number.
- Debug Log: Capture any relevant lines of the debug log as described above.
Once you have your screenshots, environment report number, and/or debug log, you can share them with us through the WordPress Support Forum for our plugin, or you can submit a ticket to our ticket system.
Congratulations!
You are now the proud owner of a self-hosted, LiteSpeed-powered, WordPress site. Enjoy it!
—
Have some of your own ideas for future WordPress Wednesday topics? Leave us a comment!
Don’t forget to meet us back here next week for the next installment. In the meantime, here are a few other things you can do:
- Subscribe to the WordPress Wednesday RSS feed
- Download LiteSpeed Cache for WordPress plugin
- Learn more about the plugin on our website
Comments