WordPress, WooCommerce, and Kubernetes with LiteSpeed Ingress Controller

In this post, you will learn to deploy WordPress, WooCommerce, and Kubernetes with LiteSpeed Ingress Controller. We’ll install the LiteSpeed Cache plugin, and load balance your environment using the LiteSpeed Ingress Controller. This real-world example, in a DigitalOcean environment, will use Kubernetes cert-manager to manage your certificate.
Preparation
This blog assumes little prior experience with Kubernetes, but does expect you to have kubectl and helm installed. You should have access to your cluster available to the console user and familiarity with text editing
We’ll be using Digital Ocean for the example environment.
- You will need
kubectlworking in your environment. See here for complete instructions. - You will need the LiteSpeed Ingress Controller installed and operational. See here for complete instructions. You can skip the Making HTTPS Work step for now as we will be doing that later.
- You will need cert-manager installed and operational. See here for complete instructions. Perform the steps up to and including Creating a ClusterIssuer. The steps below that will define the Ingress.
- You will need a real domain name that is available on the internet, and you will need to configure your environment to publish it. For Digital Ocean this is published using ExternalDNS described here.
Create some sample definitions
In addition to the previously mentioned preparation, we recommend the following sample definitions for simplicity:
- Create a namespace to deploy the pod/service/ingress into. Our sample uses the namespace
woo. Note that if you change this you will need to change the YAML file’snamespaceparameter to match the changed name:
kubectl create ns woo
Create a number of secrets to hold some useful definitions. You can change these and just note to change their YAML references below:
- The database name which we’ll name
multitenant-wp - The admin database password which we’ll name
mysqlpwd - The database user which we’ll name
userwp - The database user password which we’ll name
pwdwp
kubectl create -n woo secret generic mysql-database --from-literal=database=multitenant_wp
kubectl create -n woo secret generic mysql-password --from-literal=password=mysqlpwd
kubectl create -n woo secret generic mysql-user --from-literal=username=userwp
kubectl create -n woo secret generic mysql-user-password --from-literal=password=pwdwp
Create the persistent volumes
You will need persistent volume definitions. To create them use the text editor of your choice and create the file named 1-pv.yaml:
apiVersion: v1
kind: PersistentVolume
metadata:
  name: mysql-pv
  namespace: woo
spec:
  storageClassName: do-block-storage
  capacity:
    storage: 20Gi
  accessModes:
    - ReadWriteOnce
  hostPath:
    path: "/var/lib/mysql"
---
apiVersion: v1
kind: PersistentVolumeClaim
metadata:
  name: mysql-pv-claim
  namespace: woo
spec:
  storageClassName: do-block-storage
  accessModes:
    - ReadWriteOnce
  resources:
    requests:
      storage: 20Gi
---
apiVersion: v1
kind: PersistentVolume
metadata:
  name: wordpress-pv
  namespace: woo
spec:
  storageClassName: do-block-storage
  capacity:
    storage: 30Gi
  accessModes:
    - ReadWriteOnce
  hostPath:
    path: "/var/www"
---
apiVersion: v1
kind: PersistentVolumeClaim
metadata:
  name: wordpress-pv-claim
  namespace: woo
spec:
  storageClassName: do-block-storage
  accessModes:
    - ReadWriteOnce
  resources:
    requests:
      storage: 30Gi
---
If you changed your namespace you’ll need to update the namespace definitions above.
To create the volumes, apply the 1-pv.yaml file:
kubectl apply -f 1-pv.yaml
Install MySQL for WordPress
To install WordPress, you’ll need to install MySQL first and use the persistent volumes you created above. Create the file named: 2-mysql.yaml:
apiVersion: v1
kind: Service
metadata:
  name: mysql-wp
  namespace: woo
spec:
  ports:
    - port: 3306
  selector:
    app: wordpress
    tier: mysql
---
apiVersion: apps/v1
kind: Deployment
metadata:
  name: mysql-wp
  namespace: woo
spec:
  selector:
    matchLabels:
      app: wordpress
      tier: mysql
  strategy:
    type: Recreate
  template:
    metadata:
      labels:
        app: wordpress
        tier: mysql
    spec:
      containers:
      - image: mysql:latest
        name: mysql
        env:
        - name: MYSQL_ROOT_PASSWORD
          valueFrom:
            secretKeyRef:
              name: mysql-password
              key: password
        - name: MYSQL_USER
          valueFrom:
            secretKeyRef:
              name: mysql-user
              key: username
        - name: MYSQL_PASSWORD
          valueFrom:
            secretKeyRef:
              name: mysql-user-password
              key: password
        - name: MYSQL_DATABASE
          valueFrom:
            secretKeyRef:
              name: mysql-database
              key: database
        ports:
        - containerPort: 3306
          name: mysql
        volumeMounts:
        - name: persistent-storage
          mountPath: /var/lib/mysql
      volumes:
      - name: persistent-storage
        persistentVolumeClaim:
          claimName: mysql-pv-claim
---
If you changed the namespace or the MySQL user or passwords secret titles you’ll need to update the definitions above.
To install MySQL apply the 2-mysql.yaml file:
kubectl apply -f 2-mysql.yaml
Install WordPress
To install WordPress itself, create the file named 3-wordpress.yaml:
apiVersion: v1
kind: Service
metadata:
  name: wordpress
  namespace: woo
spec:
  ports:
    - port: 80
  selector:
    app: wordpress
    tier: web
---
apiVersion: apps/v1
kind: Deployment
metadata:
  name: wordpress
  namespace: woo
spec:
  selector:
    matchLabels:
      app: wordpress
      tier: web
  strategy:
    type: Recreate
  template:
    metadata:
      labels:
        app: wordpress
        tier: web
    spec:
      containers:
      - image: wordpress:php8.1-apache
        name: wordpress
        env:
        - name: WORDPRESS_DB_HOST
          value: mysql-wp:3306
        - name: WORDPRESS_DB_PASSWORD
          valueFrom:
            secretKeyRef:
              name: mysql-user-password
              key: password
        - name: WORDPRESS_DB_USER
          valueFrom:
            secretKeyRef:
              name: mysql-user
              key: username
        - name: WORDPRESS_DB_NAME
          valueFrom:
            secretKeyRef:
              name: mysql-database
              key: database
        ports:
        - containerPort: 80
          name: wordpress
        volumeMounts:
        - name: persistent-storage
          mountPath: /var/www/html
      volumes:
      - name: persistent-storage
        persistentVolumeClaim:
          claimName: wordpress-pv-claim
If you changed the namespace or the MySQL user or passwords secret titles you’ll need to update the definitions above.
To install WordPress apply the 3.mysql.yaml file:
kubectl apply -f 3-wordpress.yaml
Expose WordPress
Once you install WordPress you’ll want to make it available to the internet, and you do that with a Kubernetes Ingress definition. We strongly recommend that you use a real internet DNS name for your environment. This will let you use Let’s Encrypt as described in LiteSpeed’s Using Cert-manager documentation, and access it via the DNS name.
To create the Ingress, you’ll need to have created the DNS name, which is typically done by purchasing the DNS name from a vendor. After it’s available, replace the reference to YOUR DNS NAME with the actual DNS name in the example below, and save as the file 4-ingress.yaml:
apiVersion: networking.k8s.io/v1
kind: Ingress
metadata:
  name: wordpress
  namespace: woo
  annotations:
    kubernetes.io/ingress.class: litespeedtech.com/lslbd
    cert-manager.io/cluster-issuer: letsencrypt-production
spec:
  rules:
  - host: YOUR DNS NAME
    http:
     paths:
     - path: "/"
       pathType: Prefix
       backend:
         service:
           name: wordpress
           port:
             number: 80
  tls:
  - hosts:
    - YOUR DNS NAME
    secretName: YOUR DNS NAME
To install it:
kubectl apply -f 4-ingress.yaml
You know if you have everything right if you can go to your website via http://YOUR_DNS_NAME/
Configure WordPress
When you go to your website you will see the WordPress initial screen prompting you for your language:
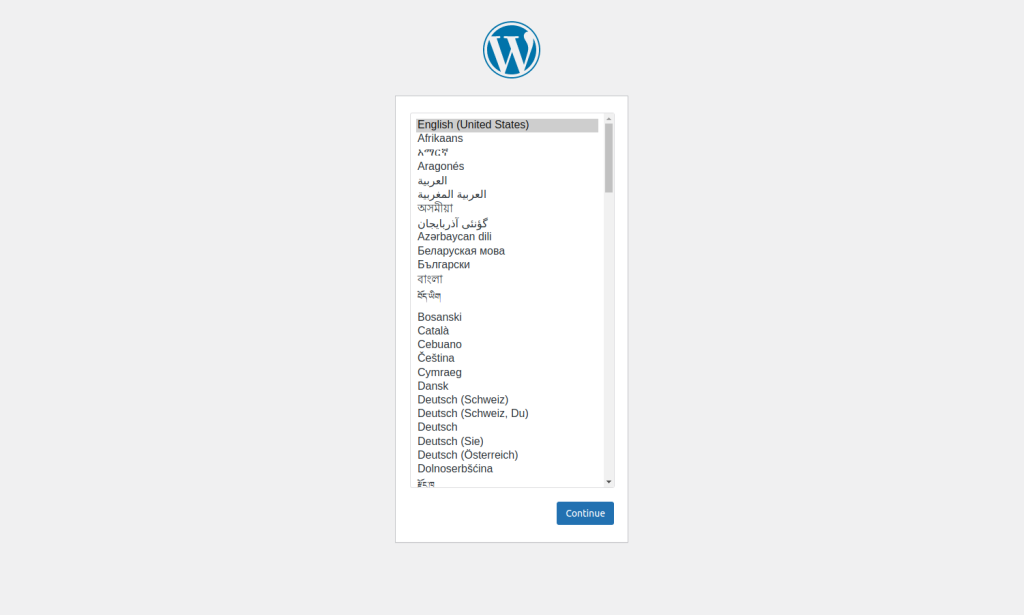
Select your language and press Continue:
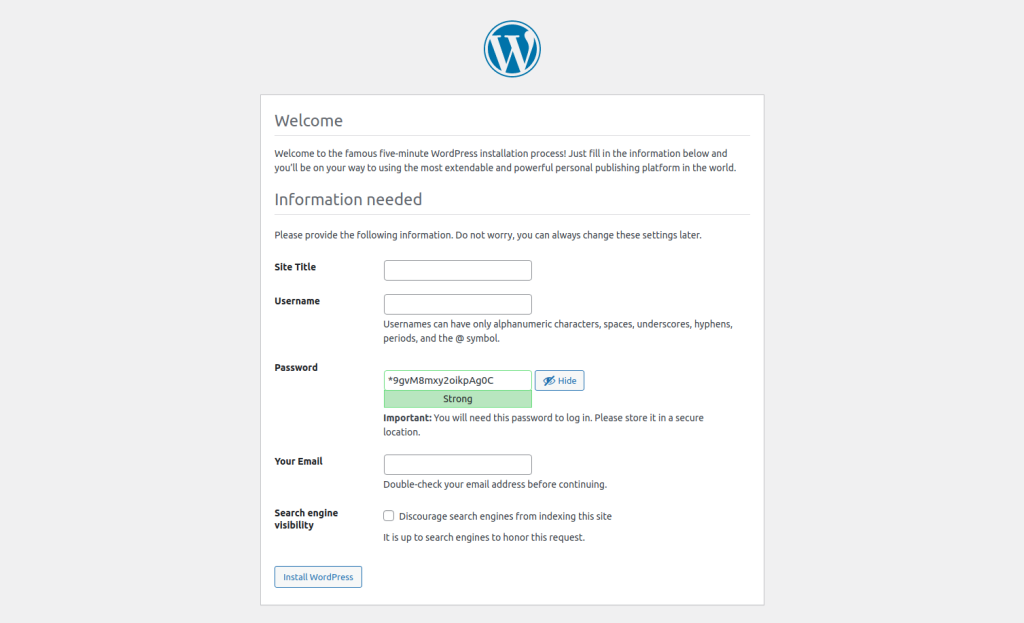
Fill in the required fields and press Install WordPress. You should get a message indicating that it was successfully installed, and you will be asked to login using the credentials you just entered. Reenter the credentials and enter WordPress.
Install LiteSpeed Cache
To install the LiteSpeed Cache plugin follow the instructions here
Install WooCommerce
To install the WooCommerce plugIn follow the instructions here
You can now configure WooCommerce with the needs of your store in mind.
You have a store
While there is still a bit of work to do in populating your store, the framework for the store is now complete. It is accessible via HTTPS. It is extremely extensible:
- By using Kubernetes now, you can add other applications, stores, web sites and more by adding more deployment/services/ingresses.
- Kubernetes Ingress lets you use the same HTTPS definition with different directory names to reference different backends, allowing you to have documention backends, additional stores, third-party sellers and more.
- Because you used cert-manager, your HTTPS certificate will be kept up to date automatically.
- If you have performance issues, there are metrics that can be used to help you identify bottlenecks. If the load balancer needs to be scaled, it’s easy to do.
- Kubernetes will monitor the health of all deployed applications. If something goes down it’s automatically restarted.
Deleting everything and putting it all back
If you need to delete everything to start over or simply to clean it up after testing, you should delete the entities in the reverse order you created them:
kubectl delete -f 4-ingress.yaml
kubectl delete -f 3-wordpress.yaml
kubectl delete -f 2-mssql.yaml
kubectl delete -f 1-pv.yaml
Delete the secrets:
kubectl delete -n woo secret mysql-database
kubectl delete -n woo secret mysql-password
kubectl delete -n woo secret mysql-user
kubectl delete -n woo secret mysql-user-password
We do not recommend that you delete the namespace as it may enter a Terminating condition it may not be able to get out of.
What a way to start!
When you need a production quality store, Kubernetes with the LiteSpeed Ingress Controller gives you the full power of all of the tools you need to get going.
Comments