WpW: Setting up Cloudfront in LSCache
Welcome to another installment of WordPress Wednesday!
Today’s topic is: Using Cloudfront with LiteSpeed Cache for WordPress
Disclaimer: The information contained in this post is accurate for LSCWP v2.2.2 [release log]. If you are using a newer version of the plugin, some details may have changed. Please refer to our wiki for the latest!
You can configure the LiteSpeed Cache plugin to work with almost any content delivery network. Today, we’ll show you how to set up CDN support, if you are using CloudFront.
Set Up in CloudFront

Set up your CloudFront CDN according to the AWS instructions.
Make a note of the Domain Name they give to you (i.e. d111111abcdef8.cloudfront.net).
Enter that domain name directly into your browser and make sure that your site comes up. If it does, then everything is in working order, and you are ready to move on to the next step.
Set Up in LSCache Plugin
From the WordPress Dashboard, navigate to LiteSpeed Cache > Settings > CDN, and do the following:
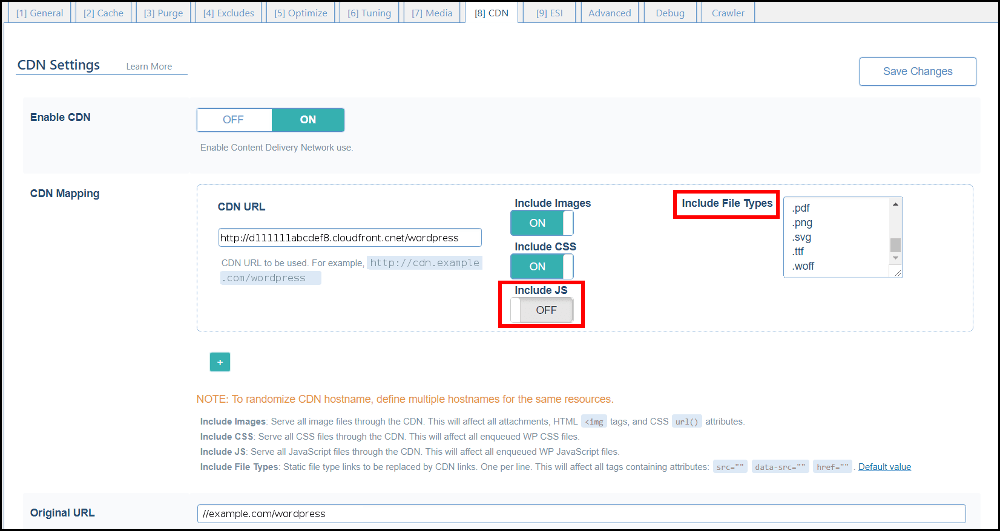
- Set Enable CDN to
ON - Enter CDN URL. This is the Domain Name you received earlier from CloudFront.
- If CloudFront will be handling your image, CSS, or JS files, set the appropriate Include buttons to
ON. - If you set any of the above buttons to
OFF, check the Include File Types box and make sure the relevant file extensions are not listed. For the example outlined in red above, Include JS is set toOFFand so we also need to remove.jsfrom Include File Types - Set Original URL to your site’s domain name (i.e.
//example.com/wordpress). - Save your changes.
Verify
In our example, Include CSS was set to ON and Include JS was set to OFF. To verify that everything is working as expected, we need to take a look at the Request URL in the headers and see from where both CSS and Javascript are being served.
To do so, navigate to your site, and press F12 to bring up the developer tools in the Network tab. Reload the page.

First, check for CSS. Select the CSS tab, and then choose the first file listed to the left. Make note of the Request URL header. Is it coming from the CloudFront domain? If so, then CSS is being served correctly.
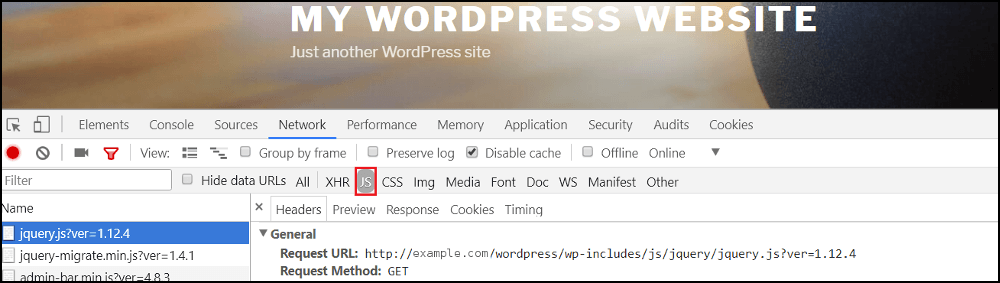
Now, check for JS. Select the JS tab, and then choose the first file listed to the left. Make note of the Request URL header. Is it coming from your original domain? If so, then JS is being served correctly.
—
Have some of your own ideas for future WordPress Wednesday topics? Leave us a comment!
Don’t forget to meet us back here next week for the next installment. In the meantime, here are a few other things you can do:
- Subscribe to the WordPress Wednesday RSS feed
- Download LiteSpeed Cache for WordPress plugin
- Learn more about the plugin on our website
Comments