JT: Using ESI in Joomla with LSCache
Welcome to another installment of Joomla Tips!
Today’s topic is: Using ESI in Joomla
Last week we discussed private cache for your Joomla site. Today we’re going to take that a step further and explore ESI, or “Edge Side Includes”. ESI takes the concepts of public cache and private cache, and combines them in a way that allows you to serve cached content flexibly and to more of your visitors, both logged out and logged in.
Please note: ESI is not supported in OpenLiteSpeed. You must be using LiteSpeed Enterprise in order to take advantage of ESI functionality.
What is ESI?
ESI is a markup language. It allows you to designate parts of your dynamic page as separate fragments that are then assembled together to make the whole page. ESI lets you “punch holes” in a page, and then fill those holes with content that has different caching requirements than the rest of the page.
For instance, ESI blocks can have different TTLs and be purged by events that are completely separate from the page they are on. Additionally, ESI blocks can contain private content even when the page they are on is publicly cached. This flexibility allows you to cache more of your site for more of your visitors. ESI is a an important aspect of any ecommerce caching strategy.
How do ESI and Public/Private Cache Work Together?
ESI allows you to disassemble a full page and treat the pieces differently from each other.
LiteSpeed Web Server allows you to store content in either the public cache or a private cache.
These two elements combine to give you something very powerful: a system that can break apart a page into public and private pieces, cache each piece appropriately, re-assemble the full-page content from the relevant caches, and then serve it to a user without ever hitting the PHP backend.
That is pretty amazing!
Examples
Let’s look at a few common scenarios where ESI is helpful.
Example #1: The Login Module
Let’s say your site has a login module on every page. You are logged in, and you visit your site’s home page, which is in the public cache.
Without ESI: Your request must invoke PHP, because the login module contains private content, and as such this page (and every other page on your site, for that matter) cannot be served to you from public cache.
With ESI: Most of this page is served to you from the public cache, but the login module is served to you from your private cache. There is no need to invoke PHP.
Other Thoughts: Technically in this scenario, you could skip ESI and use logged-in caching for every page, but private cache storage adds up, particularly if you have a busy site, or a lot of pages on your site. Using ESI here means that the only thing you need to store in private cache for each user is the contents of a single module.
Example #2: The Latest Articles Module
Let’s say you have a large site with mostly static content that rarely changes. The “Latest Articles” module appears on each page.
Without ESI: Every time a new article is published, every single page in the site must be purged so that the module displays up-to-date data. Re-populating the entire cache requires a crawler to run, or visitors to hit all of the pages of the site.
With ESI: All of the pages in the site can remain cached with a nice long TTL, while the Latest Article module is the only thing that needs to be purged. Re-populating that one bit of the cache requires just one visitor to request any page one time.
Other Thoughts: Using an ESI widget for this allows us to keep most pages in cache for a long time, while letting the module change as often as it needs to. If we weren’t using ESI for this, we’d be putting a lot of unnecessary load on the server, and increasing the chances that visitors to the site would encounter uncached content.
Enabling and Configuring ESI
When you enable ESI, you allow holes to be punched for content that will either be privately-cached, publicly-cached with its own TTL, or not cached at all.
While leaving an ESI block uncached is an option, it is not recommended. An uncached module will need to invoke PHP each time that it is requested. PHP uses a lot of resources and slows down your page considerably. If you can avoid hitting the PHP backend, you should.
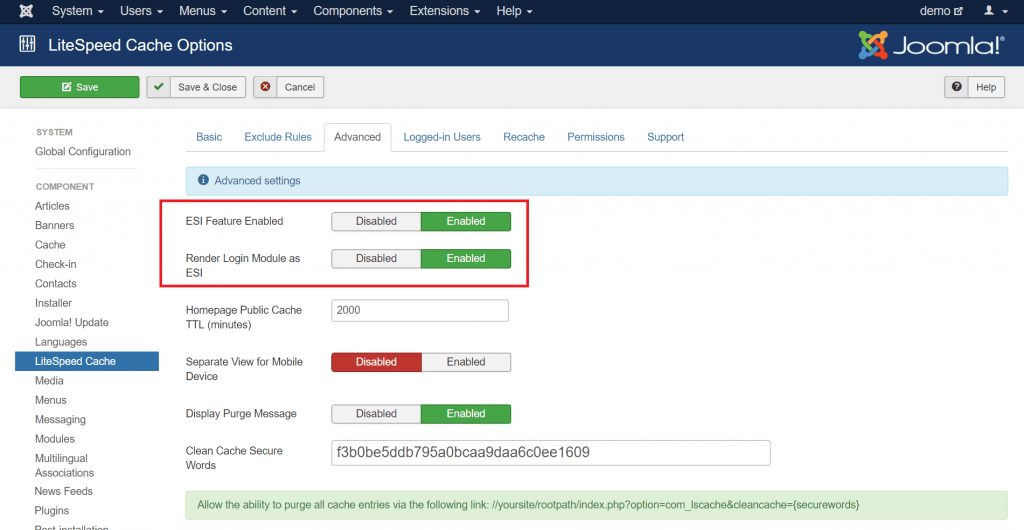
To enable ESI, navigate to System > Global Configuration > LiteSpeed Cache and click the Advanced tab. Verify that ESI Feature Enabled is set to Enabled. It should be on by default.
You can also set Render Login Module as ESI to Enabled here, although we are going to take care of that in the LiteSpeed Cache Settings (ESI Module Settings) screen below.
Rendering Modules as ESI
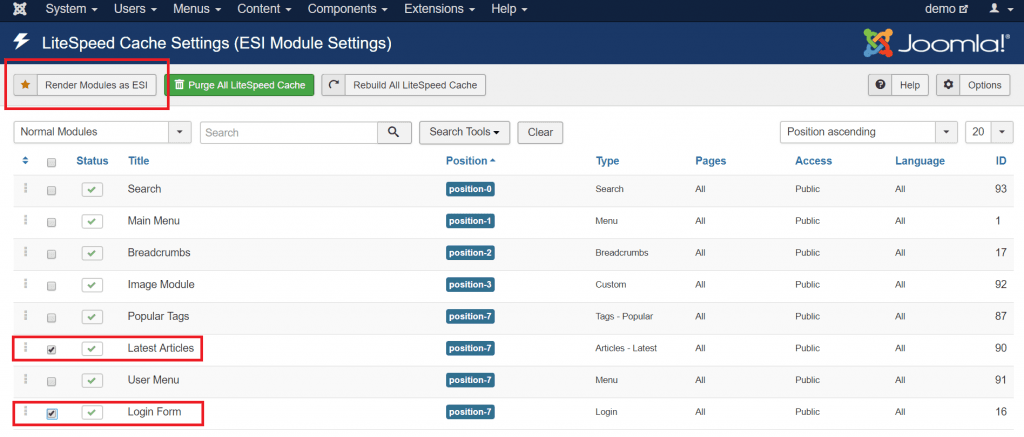
Any module can be an ESI block if you want it to be. Modules are perfectly-suited to it. They are already self-contained bits of code. Navigate to Components > LiteSpeed Cache.
Select the modules that you would like to render as ESI blocks. The following types of modules are good candidates for ESI:
- Any module that displays personalized information
- Any module that displays something different for logged in and logged out users
- Modules whose content changes very frequently compared to the rest of the site
In this example, we’ve chosen the Login Form and User Menu, but you can choose any modules that make sense for your particular installation.
Press the Render Modules as ESI button.
The display will change to show only ESI Modules. At this point, you can click on a module name to configure the ESI settings for that module, like so:
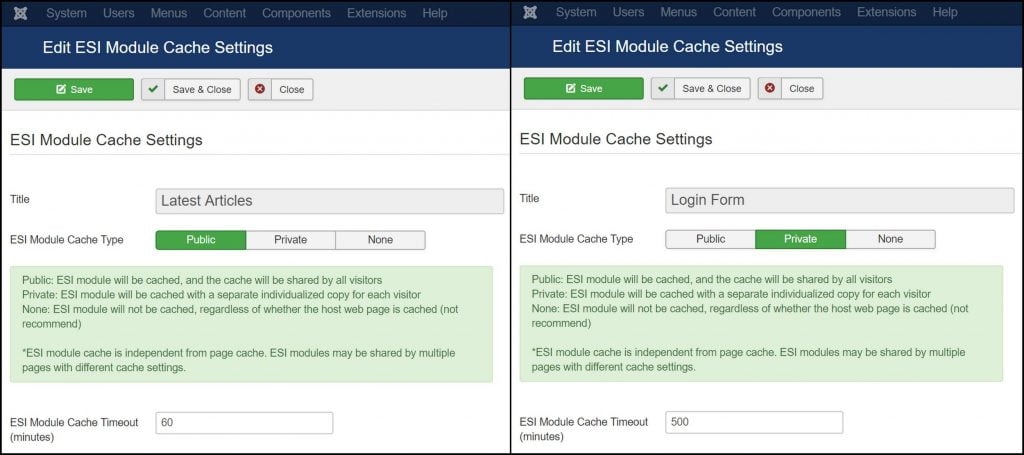
The important fields here are ESI Module Cache Type and ESI Module Cache Timeout, and how you set them depends entirely on the function of the module.
Let’s look at the two modules we are setting up. We’re using ESI with them for two completely different reasons, and so we will configure them differently. These are the same two modules from our previous examples.
Using ESI for Frequently Changing Content
We can use an ESI module to display frequently-changing content on pages that rarely change.
The “Latest Articles” module always contains public content, so we can set the ESI Module Cache Type to Public. We want to use ESI for this module because we have an active site with new content being added every hour or so. We set ESI Module Cache Timeout to ‘60’ minutes, so that the module stays up to date with the more recently published articles.
Now we are free to set the site’s Public Cache TTL to something more appropriate for a site with rarely-changing pages, like a week (or 10080 minutes).
Using ESI for Private Content on a Public Page
We can use an ESI module to punch a hole for private information on a public page.
The “Login Form” module says one thing when the user is logged out, but contains personalized content when the user is logged in. For that reason, we should set the ESI Module Cache Type to Private. We can leave the other settings at their defaults.
Then, when a user logs in, there is no need to serve them everything from private cache. We can serve all of the pages from public cache, and simply punch holes for the private content stored in the “Login Form” module.
Conclusion
So what do you think? Would you like to give ESI a try on your site?
ESI allows you the flexibility to cache more of your site in a variety of complex situations. With pages that mix-and-match private/public cache or differing TTLs, you can serve cached content to a larger percentage of your users, and keep everything running quickly and smoothly.
P.S. Want to know more technical details about ESI? Check out the official specs.
—
Disclaimer: The information contained in this post is accurate for LSCJoomla v1.2.0 [release log]. If you are using a newer version of the plugin, some details may have changed. Please refer to our wiki for the latest!
Have some of your own ideas for future Joomla Tips topics? Leave us a comment!
While you’re waiting for the next installment, here are a few things you can do:
- Subscribe to the Joomla Tips RSS feed
- Download LiteSpeed Cache for Joomla extension
- Learn more about the plugin on our website



Comments