Serving Static Content Through a Subdomain
Serving static content from a subdomain can provide multiple benefits, including better website performance and optimization. It can allow you to offload your images to a CDN, or allow you to serve a specific file extension through a different domain.
But how does this work with the LiteSpeed Cache Plugin for WordPress (LSCWP)? Let’s take a closer look.
LSCWP allows you to offload static content such as images, JavaScript, and CSS files or any file extensions you define, so that they are served from a subdomain.
This involves two main steps:
- Setting up the subdomain on your Hosting Server
- Configuring LSCWP to use the new subdomain
Step 1: Create a Subdomain
Setting up a subdomain to serve static content is a simple process that can be done with all hosting panels or even on custom servers if you’re an experienced system admin.
The goal here is to point the subdomain exactly to the same directory as the main website, so that it can access static files correctly.
Here’s an example of how to set up your subdomain using cPanel:
1.1 Create a subdomain in cPanel
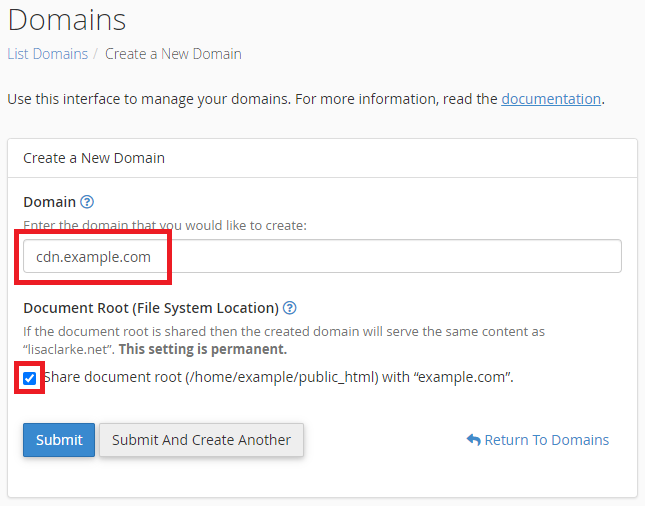
- Log into cPanel using the account where you wish to add the subdomain.
- Click Domains under the Domains section.
- Click the Create A New Domain button.
- Enter the subdomain name (
cdn.example.com) in the Domain text box. - Select the
Share document root (/home/username/public_html) with “example.com”option. Using a shared document root for a subdomain can be useful when serving static content because it allows you to easily manage and update your static files without duplicating them across multiple directories. - Click the Submit button.
1.2 Add CORS Headers
For your subdomain to be able to serve files that are originally meant for your domain, most common browsers will ask you to set up CORS headers for your domain.
Setting up a CORS header can be a bit complex depending on your stack. On Litespeed Enterprise, which has full .htaccess support, you can add this line to your .htaccess:
Header add Access-Control-Allow-Origin "*"
Header add Access-Control-Allow-Methods: "GET,POST,OPTIONS,DELETE,PUT"
Note: These are only basic CORS instructions. You should consider consulting with your developer and/or hosting provider before implementing CORS.
Step 2: Instruct Litespeed Cache to replace your URLs
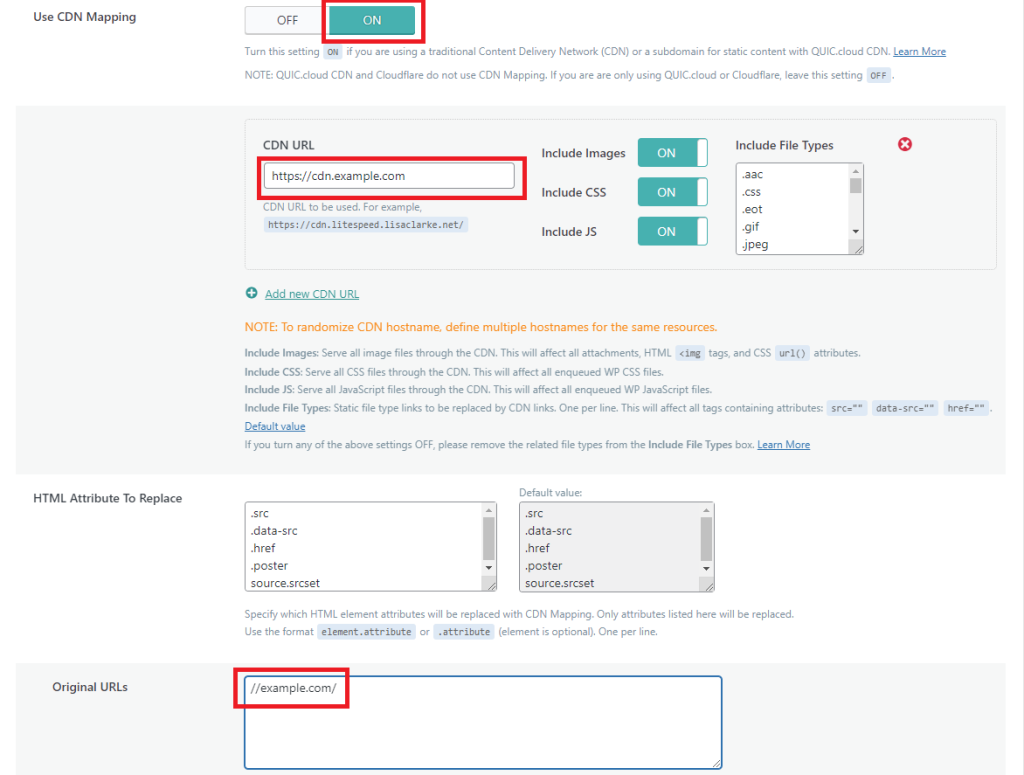
From the WordPress Dashboard, navigate to LiteSpeed Cache > CDN.
Set up CDN mapping to use the new subdomain, like so:
- Set Use CDN Mapping to
ON - Set CDN URL to
cdn.example.com - Put
//example.com/in the Original URLs box. - Save changes
Verify

Finally, you will need to test your website to ensure that everything is working correctly. Visit your website in a browser, view the site’s page source, and verify that images and other static files are being served from cdn.example.com.
Troubleshooting
URL’s are replaced in the website source, but images don’t load on the website.
Please check Step 1, and ensure that you have set up the subdomain correctly to serve your static files.
URL’s are not replaced in the website source.
Please check the Original URLs setting in LSCWP. Ensure you have set it correctly and it is the same as your WordPress site.
Some resources are not replaced but some are.
Please check the Extensions list in the LSCWP CDN Mapping settings to verify the file extensions.
Conclusion
Routing your static content using CDN Mapping from your main domain using LiteSpeed Cache for WordPress is a great way to improve your website’s performance and reduce server load. By offloading your static content to a subdomain, a CDN or a different server, you can deliver your website’s images, stylesheets, and other assets to your visitors more quickly, while also reducing the bandwidth and server resources needed to serve these files.
Comments