WpW: Crawl Your Site; Make it Fly!

Welcome to another installment of WordPress Wednesday!
Today’s Topic: LiteSpeed’s WordPress Cache Crawler
We’re going to talk about the concept of “crawling” and why it has the potential to make your WordPress site even faster.
What does a crawler do?
Our LiteSpeed Cache for WordPress plugin includes crawler functionality. What does this mean?
LSCache’s crawler, travels its way throughout the backend, refreshing pages that have expired in the cache. The purpose is to keep the cache as fresh as possible while minimizing visitor exposure to uncached content.
IMPORTANT NOTE: Crawler functionality is enabled or disabled at the server level, and its availability is controlled by your hosting provider. We’ll talk about that more below, or you can see our docs on how to enable the crawler.

Why would we want to do this?
Well, first let’s look at how pages are cached without a crawler. The whole process is initiated by user request. The cache is empty until users start sending requests to the backend. The first time a page is visited, the request hits the backend, WordPress’s PHP code is invoked to generate the page, the page is served to the user, and then stored in cache for next time.
That’s a fairly time-consuming (and bandwidth-consuming!) process for the server.
Now, let’s look at what happens when the cache is built by a crawler. When the crawler requests a page, the request hits the backend, WordPress’s PHP code is invoked to generate the page, but because of the special header that lets LSWS know that this is a crawler that initiated the request, the full page doesn’t need to be served. It is simply stored in cache.
This saves significant bandwidth.
Additionally, with the crawler refreshing expired pages at regular intervals, the chances that a user will encounter an uncached page is significantly diminished. This makes for a faster site.
Let’s look at some settings
You want the crawler to be effective in its mission, but not at the expense of your system’s performance. It’s helpful to know what some of the settings mean, so you can control just how many resources you want to give to the crawling process.
Note: We’ve selected default settings that should be reasonable for most sites, so if you don’t want to be messing around with these settings, it’s fine to leave them as-is.
Navigate to WP-Admin > LiteSpeed Cache > Crawler > General Settings and take a look at the following settings:
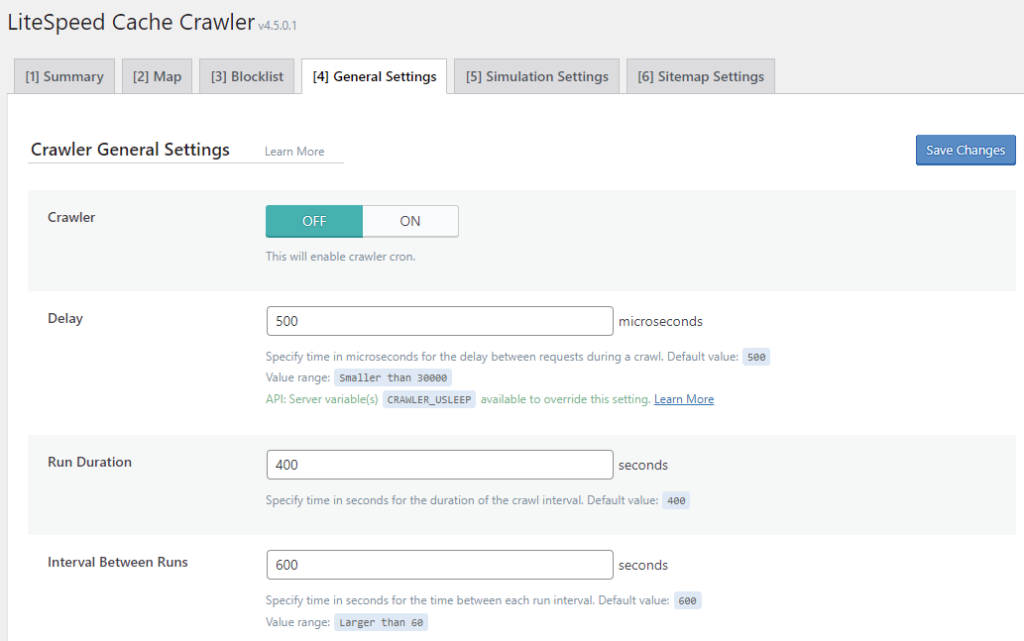
Crawler
This setting allows you to enable (ON) or disable (OFF) the crawler. It defaults to OFF.
Delay
The crawler sends requests to the backend, one page after another, as it traverses your site. This can put a heavy load on your server if there is no pause between requests. Set the Delay to let LSCache know how often to send a new request to the server. The default is 500 microseconds (or 0.0005 seconds). You can increase this amount to lessen the load on the server, just be aware that will make the entire crawling process take longer.
Run Duration
In order to keep your server from getting bogged-down with behind-the-scenes crawling, you can put limits on the crawling duration. For example, if we set Run Duration to 400 seconds, then the crawler will run for 6.66667 minutes before taking a break. After the break is over, the crawler will start back up exactly where it left off and run for another 400 seconds. This will continue until LiteSpeed crawls the entire site.
Interval Between Runs
This setting determines the length of the break mentioned above. In that same example, if we set Interval Between Runs to 600 seconds, then the crawler would pause for 10 minutes after every 1-minute run.
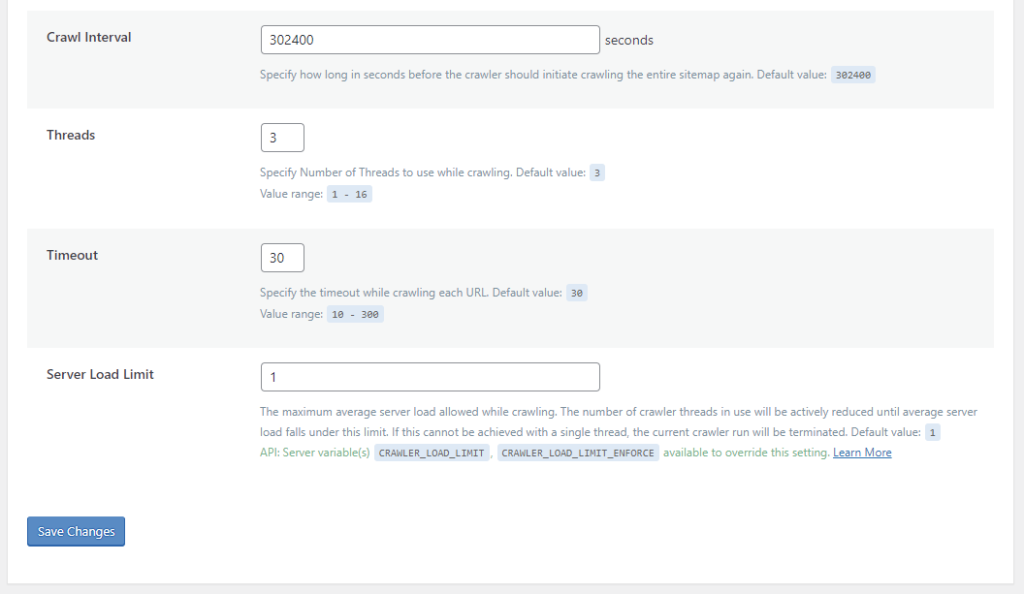
Crawl Interval
How often do you want to re-initiate the crawling process? This depends on how long it takes to crawl your site. The best way to figure this out is to run the crawler a couple of times and keep track of the elapsed time. Once you’ve got that amount, set the interval to slightly more than that. For example, if your crawler routinely takes 4 hours to complete a run, you could set the interval to 5 hours (or 18000 seconds).
Threads
When Threads is set to 3, then there are 3 separate crawling processes happening concurrently. The higher the number, the faster LiteSpeed crawls your site, but also the more load that the crawler puts on your server.
Timeout
Use this setting to specify how long you are willing to take processing a single URL. The crawler has this many seconds to crawl a page before moving on to the next page. The default is 30, but you can adjust that up or down according to your needs.
Server Load Limit
This setting is a way to keep the crawler from monopolizing system resources. Once the server’s load average reaches this limit, the crawler will be terminated, rather than allowing it to compromise server performance.
For example, to terminate the crawler once half of your server resources are being consumed, set Server Load Limit to 0.5 for a one-core server, 1 for a two-core server, 2 for a four-core server, and so on.
Protecting your server from overload
We designed all of the settings above to work together to protect your server from overload. The first four parameters (Delay, Run Duration, Interval Between Runs, and Crawl Interval) control how often and for how long to allow the crawler to run. You can set these values to give your crawler as many or as few resources as your system can afford.
Timeout keeps the crawler from getting stuck for too long on any one page.
Threads and Server Load Limit are two settings that work together to automatically terminate the crawler if it tries to get too greedy with system resources. Here’s an example:
Let’s say we have the following values set before the crawler starts:
Server Load Limit = 5
Threads = 4
The current server load is at 2, and the crawler begins. It’s crawling 4 urls at a time (due to the Threads setting), but this has caused the server load to jump up above our limit of 5. In response, the crawler drops the number of threads to 3 and keeps going.
If the server load hits our limit of 5 again, the crawler will drop the number of threads to 2 and go on. This process repeats until we are down to a single thread.
If the server load is still too high with only one crawler thread, the crawling process terminates.
On the other hand, if the server is doing just fine with one thread, the crawler will increase the number of threads one at a time, until it has either reached the Thread Limit we set (4 in this case) or our Server Load Limit.
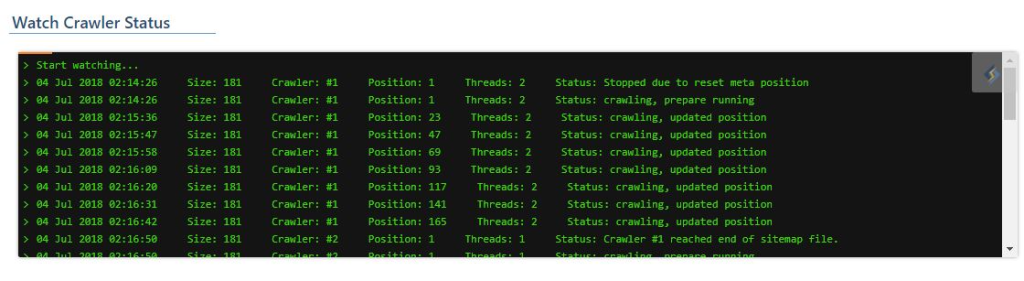
Watching the crawler do its thing
If you’re the kind of person who likes to sit in front of a terminal and watch a process making progress (and, really, who isn’t?) you’ll enjoy the Watch Crawler Status section.
Navigate to WP-Admin > LiteSpeed Cache > Crawler > Summary.
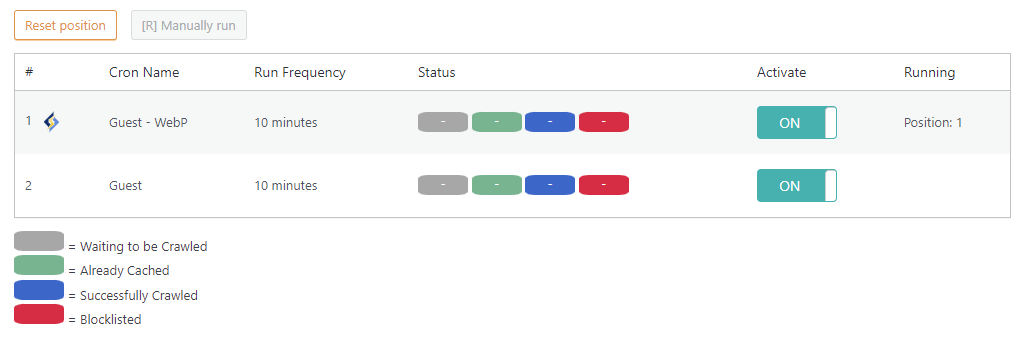
If the crawler isn’t actually running right now, make sure you set Crawler to ON on the previous screen, and that one or more of the crawlers listed on this page have Activate set to ON. If a crawler is not currently running, you can press the Manually run button.
Look at it go!
Impacts on Shared Hosting
Site owners love the crawler functionality, but if you are a shared hosting provider, chances are your first thought goes to the impact all of this crawling could have on your servers. Despite the fact that we’ve provided several features designed to minimize a crawler’s impact on the server, it’s a valid concern when you are hosting thousands of installations. This is why we have ultimately put crawler control into the hands of the hosts.
LiteSpeed Web Server disables crawling by default. This will keep usage restricted to those who truly want to use it. As host, it is your choice whether to enable crawler functionality at all. You can keep it permanently-disabled on a server-wide basis, if you do not want crawling on your system.
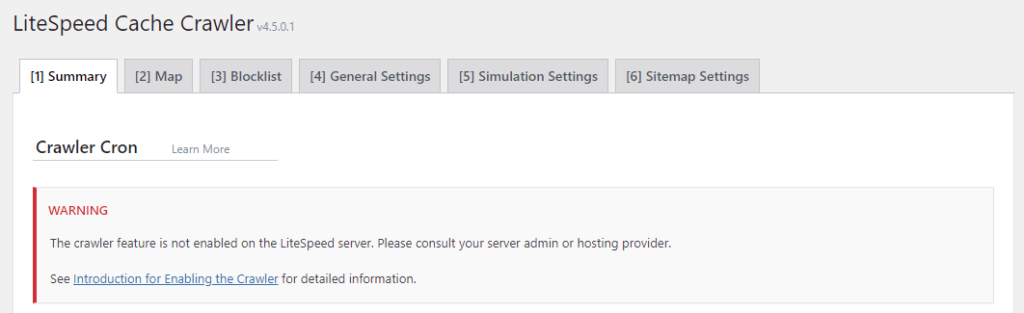
When crawling is disabled, site administrators will see the following message in WP Admin > LiteSpeed Cache -> Crawler
Warning: The crawler feature is not enabled on the LiteSpeed server. Please consult your server admin or hosting provider.
How to Enable the Crawler
NOTE: we do not recommend crawler usage for shared hosting setups unless the server has enough capacity to handle it!
There are a few different approaches you can take to crawling on your LiteSpeed Web Server:
- Disable it for the entire server
- Enable it for the entire server
- Selectively enable it for particular clients, while leaving it disabled for everyone else
Disable Crawling for the Entire Server
Do nothing. LiteSpeed Web Server disables crawling by default.
Enable Crawling for the Entire Server
You need to update the appropriate configuration file, like you did when you originally set up your cache root. Add the following:
<IfModule LiteSpeed>
  CacheEngine on crawler
</IfModule>
Selectively Enable Crawling
To enable crawling for select clients, you would not update the server’s config file. Instead, locate (or create) the virtual host include files for those clients and add the above lines to that.
The exact location of the relevant configuration or include file varies, depending on the control panel you use (or if you use no control panel at all), and which of the above options you are looking to enact. For detailed instructions, please see our documentation on the subject.
If you don’t have access to the appropriate files, you will need to ask your server administrator to enable the crawler for you.
Update It!
LiteSpeed Cache for WordPress’s crawler functionality is pretty handy, don’t you think? By regularly renewing the cache, you minimize the number of times your users have to wait for WordPress to process dynamic pages, and you speed up your whole site!
After you’ve experienced your first crawl, come back here and let us know what you think. We’d love to get your feedback.
P.S. There is more to this topic! If you want to get the most out of your crawler, take a look at these blog posts: Limiting the Cache Crawler and Managing Multiple Cache Crawlers.
—
Have some of your own ideas for future WordPress Wednesday topics? Leave us a comment!
Don’t forget to meet us back here next week for the next installment. In the meantime, here are a few other things you can do:
- Subscribe to the WordPress Wednesday RSS feed
- Download LiteSpeed Cache for WordPress plugin
- Learn more about the plugin on our website
—
This content was last verified and updated in March of 2022. If you find an inaccuracy, please let us know! In the meantime, see our documentation site for the most up-to-date information.
Comments