WpW: More About Crawling

Welcome to another installment of WordPress Wednesday!
Last week we talked about the new crawler functionality in our LiteSpeed Cache for WordPress plugin, and since then there have been some questions about enabling the crawler, and a couple of new fields added to the Settings page. Today, we thought it would be a good idea to talk about these things and get everyone up to speed and on the same page.
Enabling the Crawler
This has been the area where we’ve had the most requests for help, so let’s see if we can clear up some of the confusion.
The first thing to know is that the crawler must be enabled at the server or virtual host level. If you don’t have access to these areas, you will need to ask your web host to do it for you.
Additionally, this functionality requires the latest build of our server software, so if you’re running 5.1.16 and you are still having difficulty getting the crawler enabled, chances are you are not running the latest build (as of this writing, that is LSWS version 5.1.16 build 3). Force a reinstall, and it should work.
Enabling the crawler requires you to add a few lines to a server config file or a virtual host include file. These are those lines:
<IfModule Litespeed>
 CacheEngine on crawler
</IfModule>
Due to the fact that every control panel stores its config files in its own directory structure, we can’t just say, “update filexyz.” We have, however, written up a detailed wiki article that explains where you need to look for your particular control panel (or for no control panel at all). We recommend that you refer to the wiki to be sure you’re putting the code in the proper location.
New Fields
There are two new fields on the WP-Admin > LiteSpeed Cache > Settings > Crawler tab. Site IP allows the crawler to go directly to your server to retrieve content, without having to get the DNS involved. Custom Sitemap allows the crawler to use a sitemap you already have, rather than building its own.
Site IP
As of the plugin’s version 1.1.1, you can enter your Site’s IP address to simplify the crawling process and eliminate the overhead involved in Domain Name Server (DNS) and Content Delivery Network (CDN) lookups.
Note: a server may have multiple IPs. Use the IP address that was set for your domain in the server’s configuration.
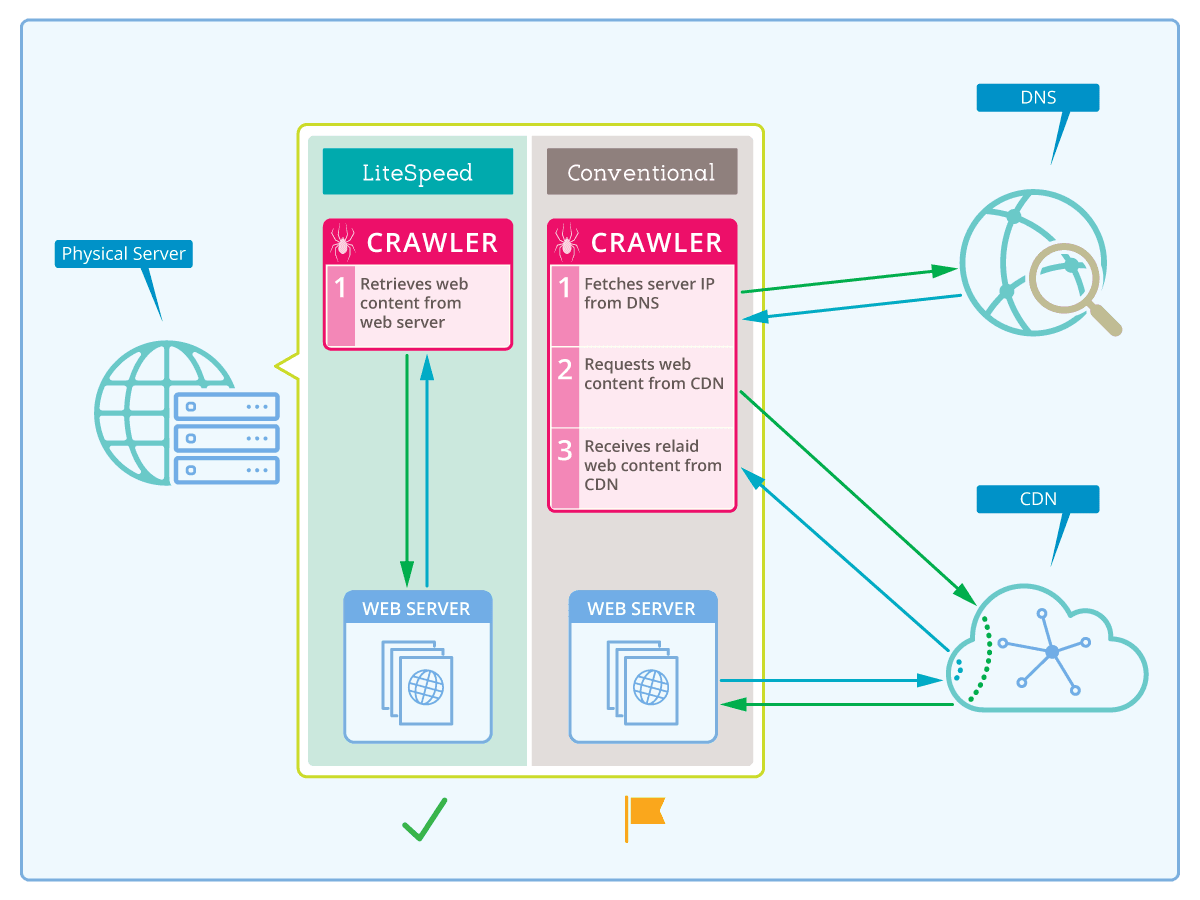
Conventionally, the crawler retrieves a URL to crawl from the sitemap, and looks to the DNS to get the URL’s IP address. If you’re using a CDN, the IP that the DNS returns is actually that of the CDN. The CDN only caches static content, so when the crawler asks the CDN for the dynamically-generated content it needs, the CDN must go back to your server to retrieve it and then return it to the crawler. This is so inefficient! The crawler, which lives on the same server as your content, needs to travel all over the internet before it can get that content!
On the other hand, if you tell LiteSpeed’s crawler ahead of time what your domain’s IP address is, it doesn’t need to involve the DNS or CDN at all. The content can be retrieved directly from the server. Nice!
To understand this better, let’s look at this diagram:

In other words…
If you are using a CDN
- The crawler retrieves
http://yourserver.com/pathfrom the sitemap - The crawler requests
yourserver.com‘s IP address from the DNS - The DNS returns the CDN’s IP address to the crawler
- The crawler requests dynamic content from the CDN
- The CDN must retrieve the page from
yourserver.com - The CDN returns the page to the crawler
If you are not using a CDN
- The crawler retrieves
http://yourserver.com/pathfrom the sitemap - The crawler requests
yourserver.com’s IP address from the DNS - The DNS returns your server’s IP address to the crawler
- The crawler retrieves the page from
yourserver.com
In both scenarios, there are lookups that occur, expending time and resources. These lookups can be eliminated by entering your domain’s IP in this field.
If Site IP has been specified
- The crawler retrieves
http://yourserver.com/pathfrom the sitemap - The crawler retrieves the page directly from
yourserver.combecause it already knows the IP address
So, you can see that by entering your site’s IP address, the middlemen are eliminated, along with all of their overhead. That’s pretty useful. Honestly, is there any reason why you would not want to use this option?
Custom Sitemap
A sitemap tells the crawler which pages on your site should be crawled. By default, LSCache for WordPress generates its own sitemap. If, however, you already have a sitemap in standard XML Sitemap format, and you’d like to use that, it’s an option as of v1.1.1.
Be sure to enter the full URL to the sitemap.
Any questions?
This covers the bulk of the issues we’ve been addressing over the last week, but if there’s something else you want to know, please do reach out to us! You are welcome to post a comment here, leave a question on the plugin forum, or open a ticket. How can we help?
—
Have some of your own ideas for future WordPress Wednesday topics? Leave us a comment!
Don’t forget to meet us back here next week for the next installment. In the meantime, here are a few other things you can do:
- Subscribe to the WordPress Wednesday RSS feed
- Download LiteSpeed Cache for WordPress plugin
- Learn more about the plugin on our website

Comments